Whenever I look into the internals of web browsers and the protocols that make the web work I usually end up feeling uneasy. The number of parts that can and do go wrong makes it incredible that anything we build works at all. The against-all-odds robustness comes from the fault tolerance and backward compatibility engrained into key parts of web stack. The browser will always do its best to output something useful whether it’s parsing a badly authored document, unable to retrieve dependencies or 10 years out of date.

404PageFound features sites created as far back as 1993 that still work when visited today.
I think this fundamental property of the web gets forgotten. Our aspirations as developers are becoming increasingly aligned with expectations set by other platforms. We’re particularly jealous of the environment smart phone developers have because as modern web developers we want to build dynamic, slick applications too. There are loads of astonishingly smart people building tools right now that allow us to just that, it’s a really exciting time to work in this industry. However, I don’t think the current crop of tools; Angular, Ember, Knockout et al. are where the future of in-browser web development lies because they’re not inherently robust.
I worry when I see sites that make JavaScript the lynchpin of getting at content now and for the future. It's putting that single point of failure at the most fragile part of the stack.
The additional complexity of the code we’re delivering and extra work we’re shifting into the browser means users might not get anything when even a small problem occurs. It’s not directly an issue with the aforementioned tools but the way in which we currently build our sites; an empty document body should not be acceptable. Our sites content should at least be accessible whether it’s requested across a crappy network connection or being run in an old browser. We must embrace the fact that the web browser is nothing like a smart phone runtime because there’s so much we can’t control!

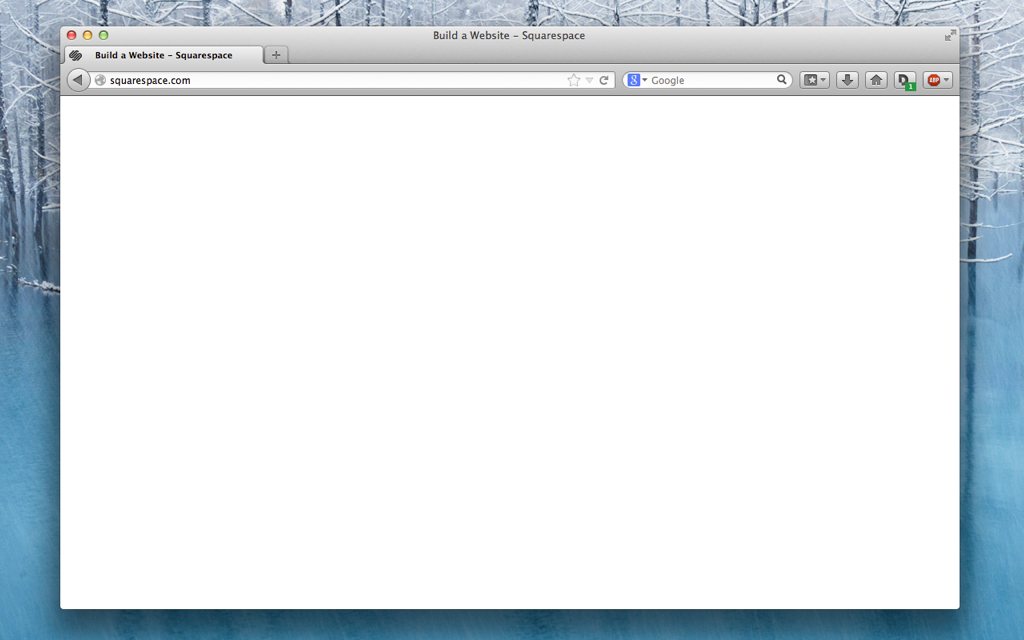
The Squarespace homepage hides all of the content, relying on JavaScript to trigger its visibility.
I’m not here to preach the philosophy of a luddite, I really don’t think we have to deliver plain HTML sites. We can definitely tackle the fragility we’re introducing into our sites but to do so we need to rethink some of the techniques we use and there are some really interesting tools coming through that provide that shift, my favourite of which right now is the React library from the developers at Facebook and Instagram.
React is exciting because it introduces a different way of building and delivering interactive interfaces. React provides a straightforward means to creating adaptive-hybrid or isomorphic web applications. The initial HTML can be generated on the server (without any headless browser shenanigans) for React to intelligently transpose itself onto when loaded in the browser.
React is not an MV-whatever framework, it only handles the ‘view’ but not with templates in the usual sense. React views are not chunks of text to be dumped into the page but instead create a lightweight intermediate representation of the DOM, a technique more catchily known as the “virtual DOM”.
Using an intermediary instead of reading and modifying the actual DOM allows a difference algorithm to calculate the fewest number of steps required to render each state. This in combination with other performance-boosting features such as clever event delegation and batched DOM updates means React has astonishing performance.
React allows applications to be written expressively–interactive by default–but can also inject robustness back into dynamic sites. It’s clever and there’s little, if any, performance penalty for it.
Example application
The example application I’m going to create is a departure board for stations on the London Underground using the TrackerNet API or “Tube Tracker” for short.

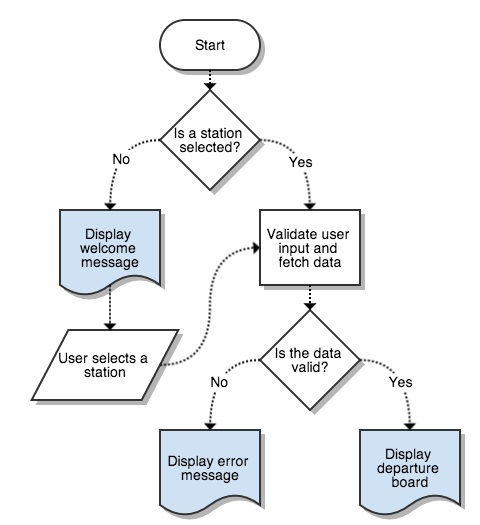
The application has only four states: displaying a welcome, loading or error message and displaying the departure board for a station. For the certified enterprise level developer the application can be expressed with the following flowchart:

Rather than go line-by-line through the process of building the application I’m going to cover a few more general tips and processes that are useful when using React for the first time.
Quick, in-browser prototypes
React applications can be prototyped quickly in the browser without any initial tooling setup. I prefer to write my components with the optional JSX syntax which allows them to be authored in a manner that closely resembles HTML. If you feel that embedding HTML in JavaScript is wrong that’s understandable given the years of separation but I’ve found it to be more productive and makes visualising structure easier than using the plain JavaScript methods. A basic document including React and the JSX transformer (available on the Facebook CDN) is all you need to get going:
<html>
  <head>
    <title>My React App</title>
    <script src="http://fb.me/react-0.13.0.js"></script>
    <script src="http://fb.me/JSXTransformer-0.13.0.js"></script>
  </head>
  <body>
    <script type="text/jsx">
      /** @jsx React.DOM */
    </script>
  </body>
</html>Component hierarchy
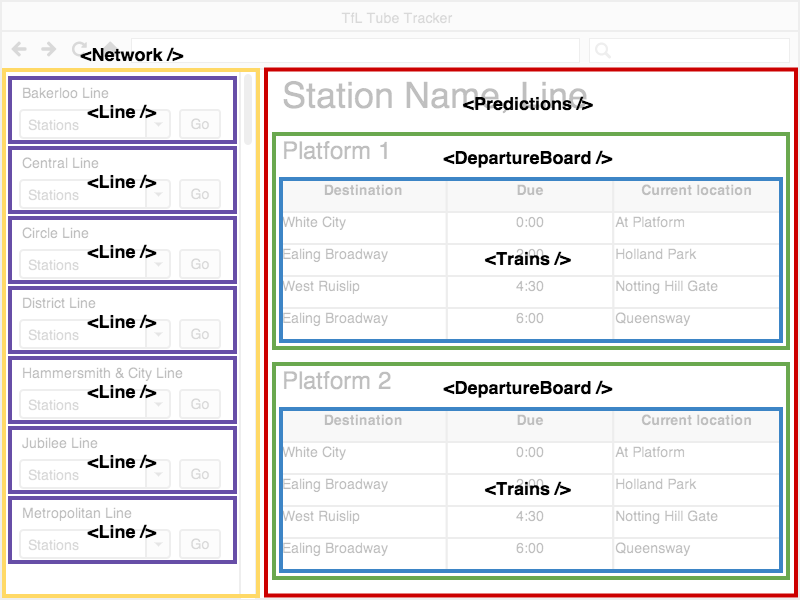
React applications are assembled with components arranged in a hierarchy. The easiest way to architect the application is to work out the responsibilities for each part of the interface and draw a box around it. Ideally each component should only handle one thing so any complex components should be split into smaller sub-components.

The Tube Tracker wireframe can be deconstructed and assembled into the following hierarchy:
TubeTrackercontains the applicationNetworkdisplays each line on the networkLinedisplays the stations on a line
Predictionscontrols the state of the departure boardDepartureBoarddisplays the current station and platformsTrainsdisplays the trains due to arrive at a platform
Props and state
React has two kinds of data; “props” that are passed between components and “state” that is stored within the component itself. A component can change its state but its props are immutable, which is a good feature because there should ideally be a single source of truth. A key architectural decision when designing a React app is deciding what data is required by each component and where the source of truth for that data should be.

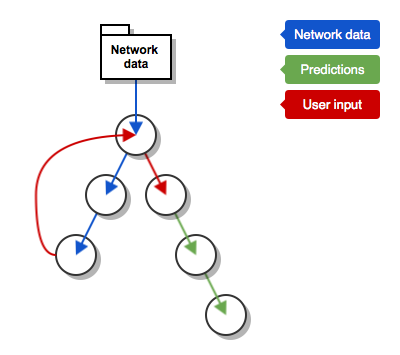
The Tube Tracker only requires 3 pieces of data: the network data (lines, stations etc), the user selected line and station and the predictions data received from TrackerNet.
The network data is consumed by the Network and Line components to provide lists of stations and also TubeTracker to validate user input. It’s a large amount of data so it’s actually better to handle it externally and pass it into the application.
The user selected line and station is consumed by Predictions which will fetch the data but the conditions are provided by Line. Following up the component hierarchy their common ancestor is TubeTracker so the selected line and station should be stored as state in TubeTracker.
Lastly, the TrackerNet predictions data is used by Trains, DepartureBoard and Predictions but not TubeTracker so it should be stored in Predictions.
But there’s a problem, data needs to be passed back up the hierarchy. When the user input is captured in the Line component its ancestor, TubeTracker, needs to know about it.
Component communication
Because data can only flow down the component hierarchy that means another technique must be used to pass data up. There are two main ways of doing so.
When a component only needs to share data with its direct ancestor then providing a callback prop is the most simple solution. React automatically binds component methods to each instance so there’s no need to worry about maintaining scope.
var Parent = React.createClass({
  handleClick: function (e) { … },
  render: function () {
    return <Child callback={this.handleClick} />;
  }
});

var Child = React.createClass({
  render: function () {
    return <a onClick={this.props.callback}>Click me</a>;
  }
});
For further reaching notifications a publish/subscribe system will be more flexible and easier to maintain. This can be done simply with native events or a library such PubSubJS, binding and unbinding with a components lifecycle methods.
var Parent = React.createClass({
  handleMyEvent: function (e) { … },
  componentWillMount: function () {
    window.addEventListener("my-event", this.handleMyEvent, false);
  },
  componentWillUnmount: function () {
    window.removeEventListener("my-event", this.handleMyEvent, false);
  },
  render: function () { … }
});

var Grandchild = React.createClass({
  handleClick: function (e) {
    var customEvent = new CustomEvent("my-event",  {
      detail: { … },
      bubbles: true
    });
    React.findDOMNode(this.refs.link).dispatchEvent(customEvent);
  },
  render: function () {
    return <a ref="link" onClick={this.handleClick}>Click me</a>;
  }
});
Component lifecycle
Components have a concise API to hook into their lifecycle; creation (mounting), updates and destruction (unmounting). Unlike other approaches to building dynamic interfaces this functionality is baked into the component definition. In the component communication example above I used the componentWillMount and componentWillUnmount methods to add and remove event listeners but there are more methods available which allow granular control over a components props and state. In the Tube Tracker app I also use the following methods:
componentDidMountis called after the component has been rendered and is useful as an integration point with other code that depends on the DOM having been generated.componentWillReceivePropswill be invoked each time the component receives new properties and is useful for cancelling any currently running operations that will be invalidated by the new properties.shouldComponentUpdateis a useful hook for manual control over whether a state or props change should require a new render.
Here’s one I made earlier
So we’ve set up an in-browser environment, deconstructed our UI into components, worked out what data is required, where the data should be stored and how it is shared within the application so it’s time for a demonstration!

I’ve used Express to setup a quick HTTP server to deliver the static files which will be further utilised in the following parts of this series. You can test the app right now (note: It’s running on a free account so this link may not be reliable) or head over to GitHub to check out the source code.
In part 2 I’ll be covering optimising the app; setting up the tools to optimise the code for the browser. Please leave a comment or send me a tweet, I’d love some feedback.